When you're managing a blog, one thing stands out as among the most important qualities you can strive to achieve: consistency.
Blogs thrive on consistency. Consistent quality is important, but more than that, consistent publication is critical. Studies have shown that it doesn't really matter if you're publishing five times a week or just once a week; you need to maintain a consistent schedule, publishing on the same day every week.
 Consistency in publication is especially important because it trains Google to check your site at just the right time to catch your new content when it's published. If you publish a new blog post every Wednesday morning, Google knows it can check every Wednesday night and index new content, and doesn't have to keep checking back for new content throughout the week.
They still will, probably (and they can check your sitemap for updates as well), but it's still a strong hint for their algorithm.
Managing a consistent publication schedule can be difficult. In particular, it's easy to forget what day it is only to realize you missed a publication window.
You can insulate yourself against this by keeping a backlog scheduled and ready to go, but there's one tool that can make life a whole lot easier: a content calendar.
A content calendar is pretty much exactly what you think it is. It's a calendar that shows you what content you're planning to publish, and when.How complex your content calendar is can vary. Some brands keep it minimal, as little more than a graphical representation of scheduled, upcoming content. Others put their entire content creation process, with layered deadlines for rough drafts, editing, images, formatting, and scheduling, all on the same calendar. These tend to be complex affairs with color coding and often live in a project management app due to their complexity.

A content calendar can help you a lot, solving problems like:
There are many benefits to using a content calendar. The only question is, how do you get one set up?
There are generally four different "classes" of content calendar. If you read the title, you know which one we're going to focus on today, but let's talk about the others in brief first.
 The first class is WordPress plugins. WordPress has a handful of different content and editorial calendar plugins you can use, which keep a graphical calendar right in your admin dashboard. These work fine if you're generally just publishing one type of content on a regular schedule, but if you want to track things like deadlines and phases of content creation, they won't have the necessary complexity.
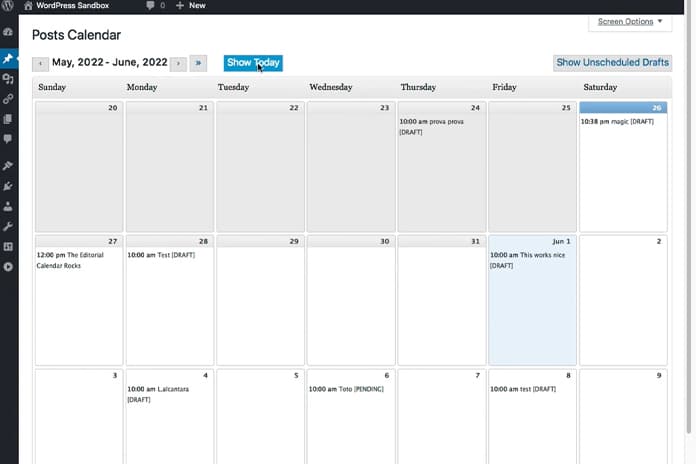
The second class is the project management app. Platforms like Trello, Asana, Basecamp, Jira, and Zoho all offer collaborative project management that can track every phase of a project and every individual employee or freelancer's contributions to the process. For smaller businesses and blogs that only have one or two writers and a relatively uncomplicated process, though, these are decidedly overkill. They can also get pretty expensive.
The third class is the jumbled pile of notes on a desk class. That's only half a joke; some people have a hard time monitoring and tracking projects on a digital platform and are better off managing everything on a physical calendar. They aren't as collaborative, but if you thrive using a physical sheet of paper, it can work for you.
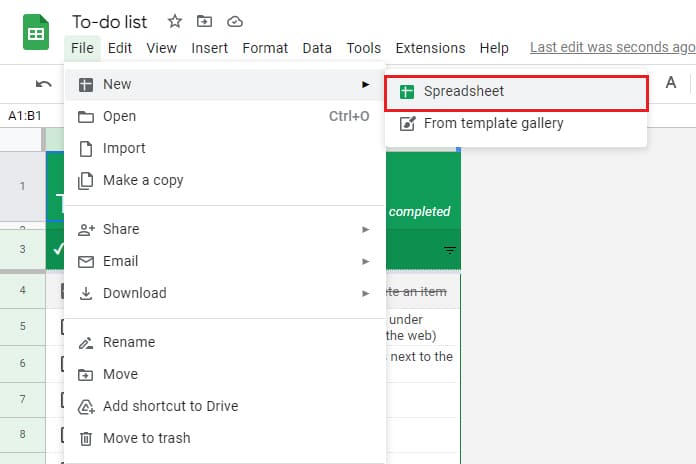
The fourth class is the DIY calendar made in a program like Google Sheets. Google Sheets (or Excel or LibreOffice Calc, or whatever other spreadsheet app of your choice you prefer) allows you to build and customize a calendar from the ground up. You can make a template of a year-long calendar and copy each month out to fill out and use, with as much or as little complexity as you need.
It takes some setup, but some people greatly prefer the option to customize their own digital, collaborative calendar. Plus, Google Sheets is free, so you don't have to worry about the fees associated with a project management suite.
The only question is, how can you make one? Here's a tutorial to set one up.
Before you start piecing together a calendar, it can be helpful to decide what information you're tracking and how formalized you want it. Google gives you plenty of flexibility with color-coded cells and dynamic data adjustments, but if you want to track three different elements with different colors in a single day, that "day" needs to encapsulate three cells.

At the most basic level, all you need to track is what content is being published on what day and what the status of that content is. Do you have a keyword? Do you have a title? Do you have a rough draft? Do you have a final draft? Is it publication-ready? Is it scheduled? Each status you choose to track can have its own way of tracking it, if you prefer. Again, you can have as much or as little detail as you want. For the sake of this post, we're going with something simple: whether or not a piece of content is scheduled for a given day, nothing more.
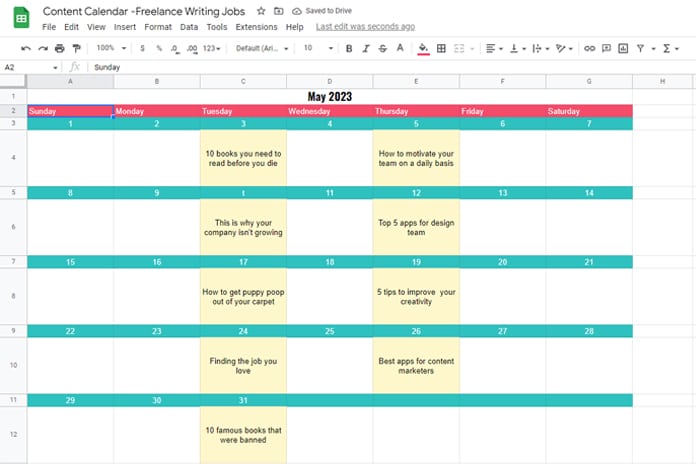
Now you're going to want to make your template. Your template is a sheet for a given month, which you can copy to a second sheet and fill out, so you don't have to re-make each month from scratch each year.
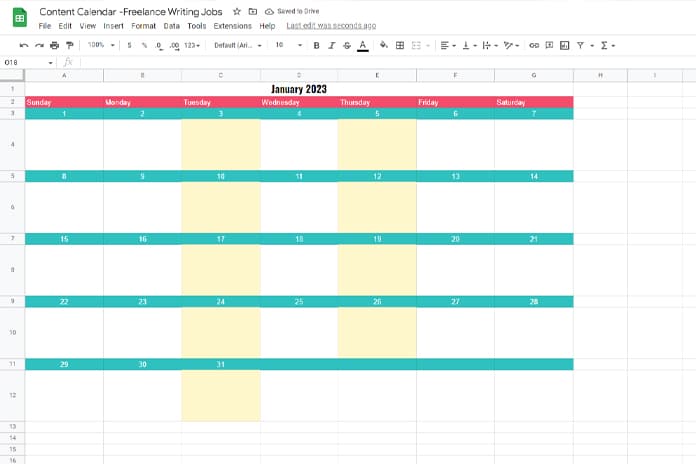
Google is relatively smart, though not as smart as something like Excel, so it will happily do some formatting for you. So, in your new sheet, in A1, type in your month and year. "January 2023" gets you started with the first month of next year, for example.
Make this your headline for your calendar. Select columns A through G (seven columns) in row 1, and click the merge button from the top bar. This merges the cells into one headline banner for the month.
You can center and format this however you like. Center, size 14 or so font, maybe a background color, whatever you like.
In row 2, add in your days of the week. Just type in each day in each column; Sunday, Monday, Tuesday, etc. You can do shenanigans with a formula to auto-fill this if you like, but it doesn't really matter as long as it gets filled out. Once again, you can format these headings as you like.
Next, you want to fill in numbers. Since all we're tracking is a single cell of data (whether or not content is published), we want one cell for each number. So, you'll have one row with the number of the day and one row with empty space for data for that day.
January 1, 2023, is a Sunday. So, in row 3, column A, just type "1". In column B, type "2". Then, you can use a bit of spreadsheet magic to auto-fill the remaining numbers. Highlight the first two cells with 1 and 2 in them, then click on the lower-right corner of the highlighted area and drag across to the end of the week. Google should auto-fill the remaining numbers appropriately.
Since we have one row of empty space for data, skip a row. To recap:
And so on. Repeat until you have a full month.
At this point, you want to make your month look nice and usable. Above, we already mentioned formatting the month and day headings, but you also want to add some space and make it look more like a calendar.
Here are some things you can do to spice it up:
If you want to mess around with formulas, you can make conditional data formatting that changes the color of a cell when something is scheduled to be published. That's not really necessary, though, so we're skipping it.
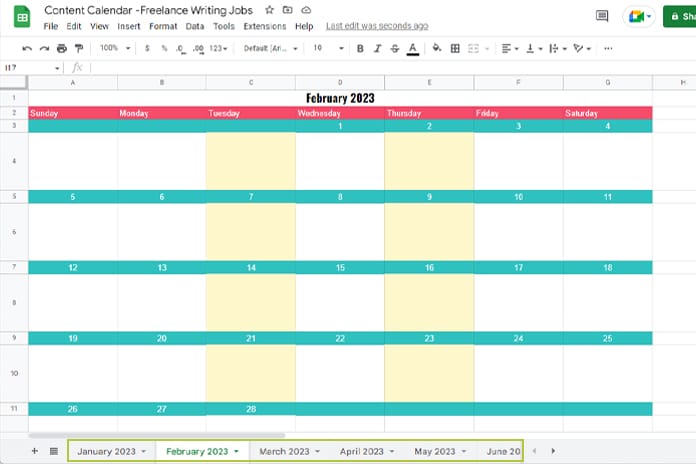
Next, you want to make February using the same process as above. Then March, then April, and so on. You can copy and paste the whole chunk of January and edit it all on the same sheet, or you can make separate sheets for each month; it's really up to how you prefer to keep your data organized.
One key here is that you don't want to use the sheet you just created. Instead, duplicate the sheet and fill out the duplicate with your data.
This way, you always have a blank template version you can duplicate and use moving forward.
Note, of course, that this is just one way of organizing your calendar, designed to look like a calendar. An alternate version might be:
Really, you can make this as simple or as complex as you want. Different people prefer different kinds of calendars and different amounts of data tracked.
Luckily, you aren't the only person to want to use Google Sheets as a content calendar. Others have come before you and made their own versions. So, here are some templates you can use.
After all, there's no reason to reinvent the wheel if you don't have to, eh?
You can see how some of these can get pretty complex; feel free to save your own copies and customize them however you like!
This is just a small selection of what's available out there. Our biggest recommendation, though, is to just pick something close to what you like and customize it. The longer you spend trying to find the perfect template, the more time you're wasting when you could just make a few tweaks to an existing template. Give it a try!
Was there any part of the process that you had questions or concerns about? If so, please be sure to leave a comment down below! We'd love to assist you however we can throughout this slightly technical task if you're having any challenges!
 How to Create a Guest Post Guidelines Page (With Template)
 5 Contract Templates for Freelance Writers and Employers (Free)
 What is an SEO Content Writer and How Much Do They Cost?
 Copywriter vs Content Writer vs Blogger: What Is the Difference?
 [Guide] How to Outsource Your Content Writing Successfully
 How Much Do Editors Charge? (Editing and Editor Prices Listed)
 What is Fluff or Filler Content and How You Can Avoid It
 The 10 Types of Affiliate Marketing Content (With Expert Tips)
 Content Writing Scams: How You Can Spot and Avoid Them
 15 Skills and Qualities to Look for in a Talented Content Writer
We encourage you to share this article on Twitter and Facebook. Just click those two links - you'll see why.
It's important to share the news to spread the truth. Most people won't.